
MIIC and Provider Organizations
- Provider Organizations Home
- Benefits of MIIC
- Enroll in MIIC
- How to Exchange Data
- VaxCheck
- News Flash
- MIIC Print Resources
Related Topics
Starting in row 11 of the template, enter client and immunization information. There can only be one immunization per row. If a client received more than one immunization, you must enter the client information in each row associated with the immunization the client received.
At a minimum, you must provide information in the following:
- Column A: Client last name.
- Column B: Client first name.
- Do not use nicknames. Information entered in the spreadsheet will update or create a client record in MIIC.
- Column D: Client date of birth.
- Column L: Vaccination date.
- Column M and/or Column N: CPT code and/or CVX code.
- Either a CPT code or a CVX code is required when reporting, but both can be included. Both codes must be reported for product-specific immunizations such as meningitis B and COVID-19.
- Vaccine codes are available at MIIC Codes for Data Submission and Exchange.
- Column R: Did org administer the dose? Y/N.
- If your organization administered the immunization, you must enter Y in this column.
- If your organization did not administer the immunization, you can enter N or leave the field blank.
- All other columns are optional. Report any information you have for these fields but do not enter “not applicable” or enter false information (such as all zeroes in the phone number column).
- If reporting address, use the two-letter abbreviation for state, such as MN.
- If reporting a phone number, you must use either the 123-456-7890 or 1234567890 format.
- If reporting race or ethnicity, you must report a single code as listed at MIIC Client Codes (Excel).
Do not move or delete any columns or rows 1-10 in the spreadsheet template, or use commas, parentheses, asterisks, or special characters anywhere in the file.
If your file includes special characters, it will be rejected.
To report a client comment, complete Columns S and T. Comment Codes are available at MIIC Codes for Data Submission and Exchange.
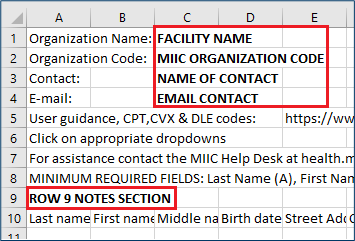
- Enter your organization’s location name and MIIC organization code to the right of the label in rows 1 and 2. Type your name and email address in the fields to the right of the labels in rows 3 and 4.
- Any notes you want to share with MIIC staff or for your reference later can be entered in row 9.
- Do not delete any rows between rows 1-10.
Save your spreadsheet as a .csv (comma-separated values) file in a location you can easily find on your computer. No other file format (including .xls) will be accepted.